Wednesday, March 30, 2016

For My Daughter


My daughter, Sarah, is now a manager working for our local In-N-Out restaurant. She was chosen to spend 6 weeks helping to train employees and open a new restaurant near Monterey, California. This is the first time she has been away from home.  She is beautiful inside and out and will undoubtedly go far in her career whether it be ruling over burger staff or running a corporation. 

It is hard when a "bird leaves the nest", even if temporarily, but this is a great opportunity and I am so proud of her! 


My daughter. My darling.

As you leave today
For adventures beyond,
I find myself weeping 
With tears of two sorts.

One is for joy
As I realize you are all grown up
And the world is yours to explore.

The second are tears of sorrow
because you are all grown up
and no longer mine.

I open my arms to let you go free
But hold you close in my heart
And there you shall stay.

Go on, introduce yourself to the world,
Sail the seas, 
Ride the winds,
Climb every mountain,
Sing in foreign notes.

You will amaze all you meet
And spread joy when you leave.
Just know you are forever in my thoughts
And my heart is your home. 


Monday, March 28, 2016

Let's Make Flowers...From Q-Tips!


Let's say you find you're in the mood to make a craft project. And, you have a box of Q-tips plus a few foam balls left over from a project you never got around to making. What do you do? Make flowers, of course!

This simple and easy project is fun to make and creates a cute flower in just an hour.


Supplies needed:
  • Styrofoam balls - I used 1.5-inch, 3-inch, and 5-inch balls
  • 1 large box of Q-tips
  • Glue gun and glue sticks
  • Food coloring
  • Rubber gloves
  • A glass bowl
  • Floral stem with leaves (pop the flower off and save it for another project) or bamboo skewers


How to make them:
Cut Q-tips in half. I used about 150 halves to cover the 3-inch ball. That makes for a full looking ball but you may use fewer spaced farther apart.


  • Heat up the glue gun. When it's ready, dab a dot of glue onto the cut end of a Q-tip and poke it into the ball. You don't have to use a glue gun but I found that it helps to hold the Q-tip in the ball permanently.
  • Timesaver tip: squirt a small pool of glue onto a paper towel and dip the end of the Q-tip into the glue rather than directly from the glue gun.
  • Keep dabbing the end of each Q-tip with glue and poking it into the ball - not too close together because it will take too long to finish but not too far apart that the ball looks half done.
  • I made a single line around the ball then made a second line of Q-tips going the opposite direction so that the ball was in quarters. You don't have to be that precise - just start glueing and poking!
  • Fill in the rest of the ball with the Q-tips until it is full.

  • At this point, you can admire your "snowball" and you are done. Imagine how cute a bowl of snowballs would be!
  • If you choose to add color to the balls, get on your rubber gloves.

  • In a glass bowl, add a few drops of food coloring to a small amount of water and stir together. 
  • Dip the Q-tips into the food coloring just enough to saturate the cotton tips. Do this over the entire ball (the food coloring will stain clothing and skin so, wear the gloves and watch your shirt!)
  • Set the balls aside to dry on a plate.
Lana's sunburst flower
  • You can display these just like that as a table top display or move on to the next step.
  • Once the balls are dry, use the glue gun to put a bit of glue on to the top of the floral stem or skewer. Poke the stem or skewer into the ball deep enough to keep the ball from flopping over.

That's it! You can make a garden of these flowers in an afternoon. They would be pretty for a springtime party or shower!


Wednesday, March 23, 2016

Sifting Sands

I love the beach! I went to college to be near one, I currently live near the Pacific ocean, and I try to vacation to one as often as possible. There's just something so beautiful in the sound of the waves and watching the ever changing shoreline. Mother Nature at her best!

The picture below is one I took while visiting Hawaii. This poem was inspired by a tropical beach painting.


Sifting sands, shifting shores,
Swaying palm trees, gentle breezes,
Blossoms scent the air.

Sunny days and moonlit nights,
Soft rains, thunderous waves,
Creatures creep on branch and shell.

Ukulele's and Haleakala,
Pineapples and plumeria,
Swinging hips and ancient culture,

Aloha islands call to me.

Monday, March 21, 2016

Cupcake Paper Flowers


Spring is in the air finally! My craft class got busy making flowers out of cupcake liner papers on St Patrick's Day - because what else is there to do to celebrate this holiday!

The rustle of paper filled the room as we made bouquets of pretty flowers in pink and white. Everyone donned their St. Pat's hats for a group photo to show off their creations.


Here's how we made the flowers...

Separate 8 cupcake liner papers. I liked the final result from using 8 papers but you may use more papers or less for your project.

Cut a sturdy heavy gauge wire to 10 inches or use a floral wire. Wind one end of the wire around a pencil a couple of times to make a flattened coil that anchors the cupcake liners in place.

Pierce the center of a cupcake liner from the inside with the straight end of the wire. 

Carefully fold the paper up and around the coiled wire center so that the paper is tightly closed. Keep piercing and folding cupcake liners nice and tight up around the previous paper until all papers have been added onto the wire. 
  

Coil the straight end of the wire around a pencil under the last liner for a final anchor.

Hold onto the bottom of the liner stack with one hand and with the other hand fluff open the paper layers into a pretty flower showing off the various "petals". 


Flower power fun! This would be great to make with the kids for Mother's Day!

Chinese Brush Painting


Chinese brush painting is a centuries old art form. It takes practice, skill, and patience - not unlike other art styles - but this brush painting technique is particularly beautiful and meditative.  

Most often done on rice paper, it is used in storytelling, nature scenes, and everyday writings, to name a few.

At the March meeting of the Concord Art Association, guest presenter Barbara Bornet Stumph, told us of her passion for this art style, showed us some of her work, and let us try our hand at creating. Read more about Barbara's Chinese brush painting presentation 


I took a stab at it but used a rock for my artwork rather than traditional paper. 


Tricky but fun! Try something new today!

Journal Pattern Play


A journal is an artists' playground! An opportunity to paint, doodle, write, layer papers, and explore new techniques. There is no limit - let your imagination take you on a journal journey!

On the pages above, I first laid down some basic squares and rectangles using watercolor paints. I kept my color choices to about 5 shades so it wouldn't be too crazy. But don't let that stop you from going with whatever moves you!

The paint dried rather quickly and I was able to move on to the really fun part - doodling. I used Sakura pigma micron pens with several tip sizes so that I could vary the design details. I love these waterproof, permanent pens but you may use any brand of permanent pens for your creation.

I played with different patterns within and around the squares and rectangles just to see what I could come up with. I liked what I made so much that I use the patterns as inspiration for design work on other pages.

Here are samples of what some of my art journaling students are working on...

Dawn Whitehead

Sandra Wolters

Sue Vanlandingham

Sandra Leonard


Aren't they a creative bunch! I am so thankful to inspire and be inspired by them.

I'd love to see what you are working on. Let's post your projects here!


Friday, March 18, 2016

New Art Prints Available!

I love photography! I venture out and try to capture nature in all it's glory and I want to share it with you (and, yes, adult beverages are part of my nature!).

Introducing the latest, greatest art prints now available for sale to you on my Etsy site. These luscious photos are 16 x 20 inches and are unframed (although I show a few of them here framed in poorly shot images - ack!). Some of these photos also come in 5 x 7 inch greeting card format perfect for framing or, gee-whiz, sending a note in the mail!


DAISIES
CACTUS FLOWER


MARTINI TIME


SEPIA SAN FRANCISCO

PEPPERS

Thursday, March 17, 2016

Martinez SWAN Day Art Show


April 9th, 2016 - come see me at the Martinez for SWAN Day – Support Women Artists Now Day – an international holiday designed to showcase the power and diversity of women’s creativity. The Martinez Arts Association sponsors this 8th annual event at the Old Train Station on Ferry St. in Martinez. 

The City of Martinez and local artists promote the concept of celebrating all forms of art including visual & performing arts. This event is FREE and we invite all artists and lovers of the arts to join in the celebration of this amazing collaboration of artists.

Artists are invited to have a FREE booth at this event and have until April 1st to submit their application to participate.

Wednesday, March 16, 2016

I Meant To Do That

Shoulda, coulda, woulda. Looking back on my life, there are times in which I would loved to have been able to hit a reset button so that I could do some things over again, better this time. If I knew then what I know now and could "do-over" certain decisions, wouldn't I be a better person today? Nah. I like where I am in life, what I've made of it so far. I own it and grow wiser each day.

This poem was inspired by a penguin toy that said "Oops! I meant to do that!".


      I meant to do that.

To follow my dreams,
Put the past behind me,
Forgive others and myself.

To smile no matter what,
Bring joy to others,
And not give in to fear.

To sing out loud,
Dance at will,
Find humor all around.

To be the best parent,
Best friend to my husband,
A sister to my friends.

     I meant to do that.

Instead, I find I'm coming up short.
At times, I fear my future,
I cry inside,
Forgiving is an art.

I walk on, knowing I am not alone on this journey.
My faith unshaken
With time, with practice, with you.

I'm becoming a better gift.

     I meant to do that.

Tuesday, March 15, 2016

Cancer Sucks, So I'm Walking


As you may or may not know, my husband Steve has been heroically battling various cancers for many years. This time, it's the esophagus and liver that are the foes. 


Handsome in Hawaii - 2005
We have found a refuge at the Cancer Support Community in Walnut Creek. I wish we had found it sooner! Steve and I have made new friends in a like situation, we've taken workshops, and found peace through their support groups. If you, or someone you know who has cancer or is/was a patient caregiver, check out what the CSC has to offer.

I have decided to "give back" to the CSC by participating in an upcoming event on May 21st - Hope Walk for Cancer  - to raise money for the center. Every $500 raised supports programs for 1 cancer patient or caregiver for a year. 

Although I am not typically one to ask for help, this cause is very dear to me, and I'll appreciate all the support I can get! Please consider looking at the link above and adding a donation.
Our 15th wedding anniversary - 2015
Together we can make a difference because, cancer sucks! 

I'm Bloglovin' It!

New friends, new blog links, new inspiration! Follow my blog with Bloglovin

Monday, March 14, 2016

The Art of Kokedama

 Kokedama what?


What the heck is a Kokedama? I'm glad you asked! 
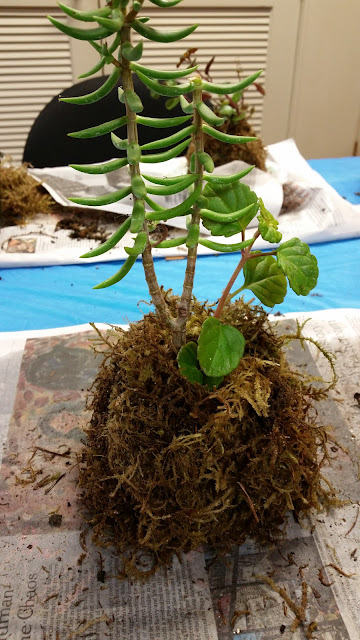
Kokedama is a style of Japanese bonsai made by taking a small plant and putting it into a ball of special soil held together with moss and string. The art of Kokedama literally translates from “koke” meaning moss and “dama” meaning ball. 

I made one of these beauties at a recent Cancer Support Community workshop given by Patrice Hanlon, a therapeutic garden designer. She gave the class a brief history of this living art form and then gave us the materials to create our own Kokedama to take home.
My plant is settled into a ball of soil then wrapped in a comfy wet burlap blanket. This helps keep the plant damp and the soil from falling apart.
Next, moss is folded up around the burlap and secured with wire or string. The moss is another layer of insulation and keeps the plant happy.
My finished Kokedama! 


These would be lovely hanging over a porch, on a decorative plate, or put inside of a nice bowl.

Here are a few more made by others in the workshop... 


To make one of your own, browse through YouTube videos. I found a short-but-sweet video made by Better Homes and Gardens

Enjoy your Kokedama!